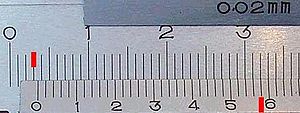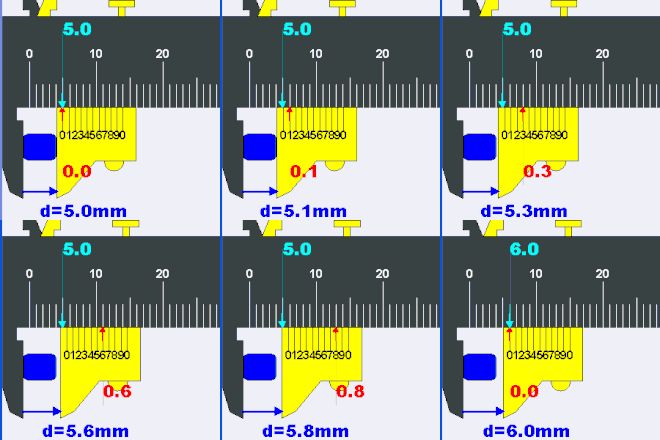
A vernier scale (/vərˈniːˈər/ ver-NEE-er), named after Pierre Vernier, is a visual aid to take an accurate measurement reading between two graduation markings on a linear scale by using mechanical interpolation, thereby increasing resolution and reducing measurement uncertainty by using vernier acuity to reduce human estimation error. It may be found on many types of instrument measuring linear or angular quantities, but in particular on a vernier caliper, which measures lengths (including internal and external diameters).
The vernier is a subsidiary scale replacing a single measured-value pointer, and has for instance ten divisions equal in distance to nine divisions on the main scale. The interpolated reading is obtained by observing which of the vernier scale graduations is coincident with a graduation on the main scale, which is easier to perceive than visual estimation between two points. Such an arrangement can go to a higher resolution by using a higher scale ratio, known as the vernier constant. A vernier may be used on circular or straight scales where a simple linear mechanism is adequate. Examples are calipers and micrometers to measure to fine tolerances, on sextants for navigation, on theodolites in surveying, and generally on scientific instruments. The Vernier principle of interpolation is also used for electronic displacement sensors such as absolute encoders to measure linear or rotational movement, as part of an electronic measuring system.
History
See also: Calipers § History, and Micrometer (device) § HistoryThe first caliper with a secondary scale, which contributed extra precision, was invented in 1631 by French mathematician Pierre Vernier (1580–1637). Its use was described in detail in English in Navigatio Britannica (1750) by mathematician and historian John Barrow. While calipers are the most typical use of vernier scales today, they were originally developed for angle-measuring instruments such as astronomical quadrants.
In some languages, the vernier scale is called a nonius after Portuguese mathematician and cosmographer Pedro Nunes (Latin Petrus Nonius, 1502–1578). In English, this term was used until the end of the 18th century. Nonius now refers to an earlier instrument that Nunes developed.
The name "vernier" was popularised by the French astronomer Jérôme Lalande (1732–1807) through his Traité d'astronomie (2 vols) (1764).
Functioning


The use of the vernier scale is shown on a vernier caliper which measures the internal and the external diameters of an object.
The vernier scale is constructed so that it is spaced at a constant fraction of the fixed main scale. So for a vernier with a constant of 0.1, each mark on the vernier is spaced 9/10 of those on the main scale. If you put the two scales together with zero points aligned, the first mark on the vernier scale is 1/10 short of the first main scale mark, the second is 2/10 short, and so on up to the ninth mark, which is misaligned by 9/10. Only when a full ten marks are counted, is there alignment, because the tenth mark is 10/10—a whole main scale unit—short, and therefore aligns with the ninth mark on the main scale. (In simple words, each VSD = 0.9 MSD, so each decrement of length 0.1 adds 10 times to make one MSD only in 9 divisions of vernier scale division).
Now if you move the vernier by a small amount, say, 1/10 of its fixed main scale, the only pair of marks that come into alignment are the first pair, since these were the only ones originally misaligned by 1/10. If we move it 2/10, the second pair aligns, since these are the only ones originally misaligned by that amount. If we move it 5/10, the fifth pair aligns—and so on. For any movement, only one pair of marks aligns and that pair shows the value between the marks on the fixed scale.
Least count or vernier constant
The difference between the value of one main scale division and the value of one vernier scale division is known as the least count of the vernier, also known as the vernier constant. Let the measure of the smallest main-scale reading, that is the distance between two consecutive graduations (also called its pitch) be S, and the distance between two consecutive vernier scale graduations be V, such that the length of (n − 1) main-scale divisions is equal to n vernier-scale divisions. Then
- the length of (n − 1) main-scale divisions = the length of n vernier-scale division, or
- (n − 1)S = nV, or
- nS − S = nV.
Vernier acuity
Main article: Vernier acuityVernier scales work so well because most people are especially good at detecting which of the lines is aligned and misaligned, and that ability gets better with practice, in fact far exceeding the optical capability of the eye. This ability to detect alignment is called vernier acuity. Historically, none of the alternative technologies exploited this or any other hyperacuity, giving the vernier scale an advantage over its competitors.
Zero error
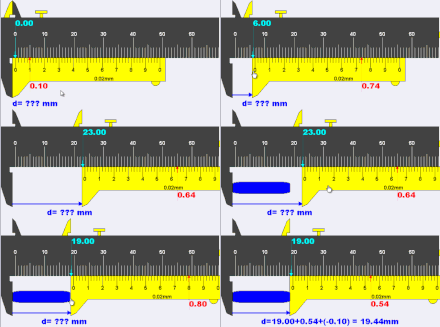
Zero error is defined as the condition where a measuring instrument registers a nonzero value at the zero position. In case of vernier calipers it occurs when a zero on main scale does not coincide with a zero on vernier scale. The zero error may be of two types: when the scale is towards numbers greater than zero, it is positive; otherwise it is negative. The method to use a vernier scale or caliper with zero error is to use the formula
- actual reading = main scale + vernier scale − (zero error).
Zero error may arise due to knocks or other damage which causes the 0.00 mm marks to be misaligned when the jaws are perfectly closed or just touching each other.


Positive zero error refers to the case when the jaws of the vernier caliper are just closed and the reading is a positive reading away from the actual reading of 0.00 mm. If the reading is 0.10 mm, the zero error is referred to as +0.10 mm.
Negative zero error refers to the case when the jaws of the vernier caliper are just closed and the reading is a negative reading away from the actual reading of 0.00 mm. If the reading is 0.08 mm, the zero error is referred to as −0.08 mm.
If positive, the error is subtracted from the mean reading the instrument reads. Thus if the instrument reads 4.39 cm and the error is +0.05, the actual length will be 4.39 − 0.05 = 4.34. If negative, the error is added to the mean reading the instrument reads. Thus if the instrument reads 4.39 cm and as above the error is −0.05 cm, the actual length will be 4.39 + 0.05 = 4.44. (Considering that, the quantity is called zero correction which should always be added algebraically to the observed reading to the correct value.)
- Zero error (ZE) = ±n × least count (LC)
Direct and retrograde verniers
Direct verniers are the most common. The indicating scale is constructed so that when its zero point coincides with the start of the data scale, its graduations are at a slightly smaller spacing than those on the data scale and so none but the last graduation coincide with any graduations on the data scale. N graduations of the indicating scale cover N − 1 graduations of the data scale.
Retrograde verniers are found on some devices, including surveying instruments. A retrograde vernier is similar to the direct vernier, except its graduations are at a slightly larger spacing than on the main scale. N graduations of the indicating scale cover N + 1 graduations of the data scale. The retrograde vernier also extends backwards along the data scale.
Direct and retrograde verniers are read in the same manner.
Recent uses
This section includes references to techniques which use the Vernier principle to make fine-resolution measurements.
Vernier spectroscopy is a type of cavity-enhanced laser absorption spectroscopy that is especially sensitive to trace gases. The method uses a frequency-comb laser combined with a high-finesse optical cavity to produce an absorption spectrum in a highly parallel manner. The method is also capable of detecting trace gases in very low concentration due to the enhancement effect of the optical resonator on the effective optical path length.
See also
- Micrometer
- Nonius – device invented by Pedro Nunes
- Pierre Vernier
- Slide rule – graphical analog calculator
- Transversal (instrument making) – technique in use prior to vernier scales
References
- Vernier, Pierre (1631). La Construction, l'Usage et les Propriétez du Quadrant Nouveau de Mathématique [The Construction, Use, and Properties of the New Mathematical Quadrant] (in French). Brussels, (Belgium): Francois Vivien.
- Barrow called the device a Vernier scale. See: John Barrow, Navigatio britannica: or a complete system of navigation ... (London, England: W. and J. Mount and T. Page, 1750), pp. 140–142, especially page 142.
- Daumas, Maurice, Scientific Instruments of the Seventeenth and Eighteenth Centuries and Their Makers, Portman Books, London 1989 ISBN 978-0-7134-0727-3
- Lalande, Jérôme (1764), Astronomie, vol. 2 (Paris, France: Desaint & Saillant), pages 859-860.
- Vernier acuity definition at the Online Medical Dictionary.
- Kwan, A. (2011). "Vernier scales and other early devices for precise measurement". American Journal of Physics. 79 (4): 368–373. Bibcode:2011AmJPh..79..368K. doi:10.1119/1.3533717.
- Davis, Raymond, Foote, Francis, Kelly, Joe, Surveying, Theory and Practice, McGraw-Hill Book Company, 1966, LC 64-66263.
- Feng Zhu; James Bounds; Aysenur Bicer; James Strohaber; Alexandre A. Kolomenskii; Christoph Gohle; Mahmood Amani; Hans A. Schuessler (2014). "Near infrared frequency comb vernier spectrometer for broadband trace gas detection". Opt. Express. 22 (19): 23026–23033. arXiv:1407.1075. Bibcode:2014OExpr..2223026Z. doi:10.1364/OE.22.023026. PMID 25321773. S2CID 119270139.
External links
- Use of vernier scale in mm and cm – simulator
- Use of vernier scale in inch – simulator of measurement and interpretation
- How to read a vernier caliper
- Calculation of Least Count in Metric & Imperial Scales of Vernier Caliper